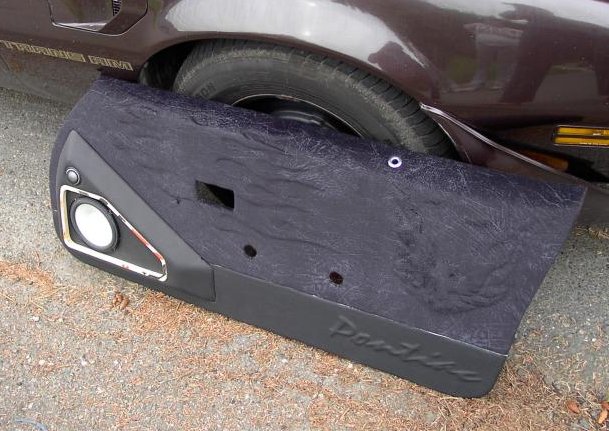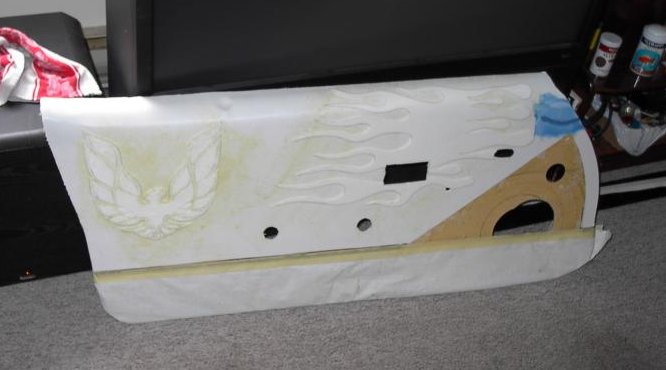


Ok, you guys asked for
a how to page on my panels, well here it goes. I don't have any pictures of
the build up of them so I will describe it the best I can.
For the tops, I started
with a 3/16" thick piece of hard board. I used a plastic laminate stuff
that we make at work( I work at a plywood plant) buy you can use pressboard or
Micarda board will work too. Just as long as it is not to thick and is fairly
strong to resist warping.
Materials list
Hard board of some type 3/16" approx. in thickness
Contact Cement
Closed Cell Foam I used 1/4" thickness
Fabric of your choice Something stretchy like vinyl
Little roller To roll fabric down smooth
I started by dissecting
my tattered original panels and removing the upper plastic curve piece that
form the door panel contour. Using the old door panel backing as a template, I
marked and cut the new hardboard.
Then with Contact cement
and staples, I attached the plastic door panel curve to the top. Once dry, I
completely coated the new panel with Contact Cement and coated a matching
piece of 1/4" closed cell foam. When they were tacky, I pressed the
closed cell foam onto the hardboard, creating the underlay for the fabric. Once the Contact Cement
had dried, it was time to do the design.
The design is just more
pieces of the closed cell foam glued overtop of the foam we glued on tn the
previous step. Making both sides the same here is the key. Once you are happy
with your design on one door, use those pieces as a template to cut the other
door.
I have done panels this
way with more than one layer of design, you just need to stack the foam pieces
untill you get the desired contour/pattern. It would be advisable, depending
on your design to use thinner than 1/4" foam for the backing and in certain
parts of your design. You don't want the panel getting too thick, especially
around the edges and not allowing the door to close properly

Then, just like you glued
the base foam to the new panel, you use contact cement to glue the pattern on.
Once the cement had fully dried, now comes the fun part. You need to cut your
material to a shape a little larger than the door panel. Then completely coat
the backside of the fabric with more cement. Make sure you get a good even
coverage. Bare spots will lift over time. Then cover the door panel with
contact cement also. Pay close attention to the steps between the raised
design and the backing. You need to get the cement right into the corners, but
don't put so much on as to pools in spots. Just a nice even coating will be
fine.
Once the cement has dried
to tackiness it is tome to lay the fabric. It might be best to have someone
help you with it. Lay the fabric into place trying to get no wrinkles in it.
Then, using the roller, roll the fabric onto the door panel to create a good
bond. Pay close attention to around your design, you want that to stick
tightly and highlight your design.
Once everything is dry, I
used more cement to glue the extra material around the back of the door panel.
Giving the wrapped in fabric look.
To do the lower half in vinyl, upper in cloth I made a 1/8" gap in the foam base. Then, taped off the lower part. Applied the glue to the upper portion and applied the fabric, pressing it tightly into the 1/8" gap. When it was all dry, I cut down the center of the gap, then repeated the process for the lower half.
The speaker pod was made from plywood. Cutting and sanding to shape. Then I covered it with 1/8" thick fiam and then vinyl. It is attached via screws through the back. I will be attaching the whole door panel via nice black screws that should appear almost invisible as it was pretty hard to line up and attach the stock panel clips.

You can use basically whatever fabric you desire, Just make sure it is somewhat stretchy. and thick and durable. You wouldn't want it wearing out prematurely The stuff I used wasn't that stretchy, and it's real hard to get it to lay in the contour's of the design. The next time, I'm using vinyl. The vinyl on the lower halves was gotten form a Auto upholstery place. I have used other types of vinyl before, but this stuff is SUPER pliable and soft. It stretched, and went on very easily. I guess it should at $45 a yard.
That about sum's it up. I
am going to be doing the Hood Bird of my 81 on the headliner in the same fashion
as described here. I really have to get off my but and get started in it. It
will be the whole size off the roof, sculpted out of 1/4" foam, covered
with the same fabric as the doors. The neat thing I am incorporating is a piece
of Plexiglas, frosted to defuse light, and some red LED's around the plexi so
his EYE glows red for the interior light!! I have done similar things with
lighting on my computer case. My comp has a window in the side, Water-cooled
processor and video card. If I have time, I will pose stuff about it too.
Go to: